How to Attach Welded Wire Fencing to T-Posts?
How to Attach Welded Wire Fencing to T-Posts?
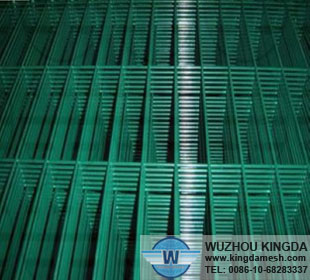
A T-post has one side that has bumps every couple inches. These bumps are used to support the fencing material once it has been fastened to the post. Special fasteners call T-post clips conveniently wrap around the post and fasten to the fencing material. Welded wire fencing can be attached to T-posts using these clips and a pair of specialized pliers. Welded wire fencing is made up of multiple strands of crisscrossing wires. The clips attach to the wires that run horizontally.
Unroll the welded wire fencing along the entire length of the fence on the bumpy-faced side of the T-posts. Lift the fencing up and hold it to the bumpy-face of the first post. Stand behind the fence post and place a T-post clip around the post so that the middle part of the clip cradles the back of the post.
Push the hooked side of the clip up and over the top wire running horizontally on the welded wire fencing. Push the longer looped side over the top of the wire on the other side of the post. Ensure the top wire of the fencing is resting just above a metal bump on the front side of the T-post.
Grasp the looped side of the T-post clip with the specialized fencing pliers. Hold the clip and fencing in place with one hand on the T-post while bending the looped side of the clip down and around the fence wire until it is snug. Let go of the fence to see if it holds in place. Clamp the jaws of the pliers over the hooked side of the clip and crimp the hook closed over the wire.
Continue placing T-post clips down each post about every six wires until reaching the bottom of the welded wire fencing.
Stretch the welded wire fencing to the next post, keeping the fence tight while attaching the clips, and repeat the process.